|
|
|
Suggested
Teaching Activities:
|
Distance
and Time
Experiment
Profile
1.
Objective
To
investigate the relationships between position, velocity,
and acceleration against time.
2.
Theory
When
describing the motion of an object, knowing where it is
relative to a reference point, how fast and in what direction
it is moving, and how it is accelerating (changing its
rate of motion) is essential. As the object moves, the
change in its position is measured many times each second.
The change in position from moment to moment is expressed
as velocity (metres per second). The change in velocity
from moment to moment is expressed as an acceleration
(metres per second). The position of an object
at a particular time can be plotted on a graph.
3.
Equipment List
|
|
Datalogger
interface |
|
|
Base
and support rod |
|
|
Motion
sensor |
Procedure
For
this activity, your hand will be the object in motion.
The motion sensor will measure your hand position as you
move in a straight line at different speeds. We will use
the datalogger software to plot the motion on a graph
of position and time.
Computer
Set-up
| 1.
|
Connect
the datalogger interface to the computer. |
| 2.
|
Connect
the motion sensor to the interface. |
| 3. |
Open
the datalogger software to create a new data file
for this activity. |
| 4. |
Record
the data of time (sec) , position (m), velocity (v)
and acceleration (a).
|
| 5. |
Prepare
to plot graphs of position versus time, velocity versus time
and acceleration versus time. |
Experiment
Set-up
Set-up
the motion sensor as shown in the following graph. Make
sure you can move at least 2 metres away from the motion
sensor. Position the computer monitor so that
you can see it while you move away from the motion sensor.
Data
Recording
Place
your hand in front of the motion sensor.
Use the datalogger software to start recording data. Watch
the plot of your hand's motion on the graph and try to
move so that the graph display is a straight line with
different angles.
Data
Table
Conclusion
and Extensions
| 1.
|
What
is the relationship between the slope of the position
versus time graph and the velocity graph? |
| 2.
|
Describe
the line shown in the graph of acceleration versus time |
| 3. |
Try
to move to get a different acceleration versus time graph
and describe your motion. |
|
|
|
How
steady is a pendulum?
A
pendulum is a clever timing device that was once used to help
clocks keep time. If you were making a clock, you would need
to know all about pendulums.
Does the
time for a swing depend upon the size of the swing? How does
the pendulum change its speed while it is swinging?
You can
begin to answer these questions using a sensor connected to
a PC.
One complete swing of a pendulum - back and forth - is called
a period. The size of a swing is called the amplitude.
Setting
up
| 1. |
Connect
a position or angle sensor to the interface. Connect the
interface to the computer. |
| 2. |
Get the computer ready to measure the position of the
pendulum arm over 10 to 30 seconds. |
| 3. |
Start the computer recording and the pendulum swinging. |
| 4. |
Adjust
the sensor to reset the computer to read zero when the
pendulum is at rest. |
| 5. |
Start recording on the computer only when you start
to move the pendulum. |
| 6. |
Try to get the computer to let you keep two or more sets
of swings on the screen. |
Make
a plan
Your task is to find out if the size of the swing affects
the time for a swing. You will need to record several swings
- some large and some small. Decide whether you will start
with a large swing and then try smaller ones - or whether
you will start with a small swing and then larger ones.
Questions
| 1. |
Study
the graph. How can you tell that the pendulum is at the
mid-point of its swing? |
| 2. |
With
your graph on the screen, use the computer to read off
the time for large and small swings. |
| 3. |
Is there a simple pattern in the results? Why then are
pendulums used in clocks? |
| 4. |
Choose
one of the peaks on the graph. Use the computer to read
off the gradient at the different points shown in the
diagram. Print the graph and label the points where:
the pendulum speed is highest
the pendulum speed is lowest
the pendulum speed is increasing
the pendulum speed is decreasing |
Extensions
How does the mass of the ball affect the period of
a swing? Do an experiment where you measure the periods of
large, medium and small balls.
Impulse
and Momentum
1.
Introduction
The
impulse-momentum theorem relates impulse, the average force
applied to an object times the length of time the force is
applied, and the change in momentum of the object:
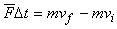
Here
we will only consider motion and forces along a single line.
The average force is the net force on the object, but in
the case where one force dominates all others it is sufficient
to use only the large force in calculations and analysis.
For
this experiment, a dynamics cart will roll along a level track.
Its momentum will change as it reaches the end of an initially
slack elastic tether cord, much like a horizontal bungee jump.
The tether will stretch and apply an increasing force until
the cart stops. The cart then changes direction and the tether
will soon go slack. The force applied by the cord is measured
by a force sensor. The cart velocity throughout the motion
is measured with a motion sensor. Using "datalogger software"
to find the average force during a time interval, you can
test the impulse-momentum theorem.
2.
Objective
|
|
Measure
a cart momentum change and compare it to the impulse it receives. |
|
|
Compare
average and peak forces in impulses. |
3.
Equipment List
| |
Datalogger
interface |
| |
Motion
sensor |
| |
Force
sensor |
| |
Dynamics
cart and track |
| |
Elastic
cord |
| |
String |
Procedure
| 1.
|
Measure
the mass of your dynamics cart and record the value in
the data table.
|
| 2.
|
Connect
the motion sensor and force sensor to the datalogger interface.
Reset the force sensor
|
| 3. |
Open
the datalogger software and the experiment worksheet.
|
| 4. |
Place
the track on a level surface. Confirm that the track is
level by placing the low-friction cart on the track and
releasing it from rest. It should not roll. If necessary,
adjust the track.
|
| 5. |
Attach
the elastic cord to the cart and then the cord to the
string. Tie the string to the force sensor a short distance
away. Choose a string length so that the cart can roll
freely with the cord slack for most of the track length,
but can be stopped by the cord before it reaches the end of
the track. Clamp the force sensor so that the string and
cord, when taut, are horizontal and in line with the cart
motion.
|
| 6. |
Place
the motion sensor beyond the other end of the track so
that the detector has a clear view of the cart motion
along the entire track length. When the cord is stretched
to maximum extension the cart should not be closer than
0.4cm to the detector.
|
| 7. |
Reset
the force sensor to zero.
|
| 8. |
Practice
releasing the cart so it rolls toward the motion sensor,
bounces gently, and returns to your hand. The force sensor
must not shift and the cart must stay on the track. Arrange
the cord and string so that when they are slack they do
not interfere with the cart motion. You may need to guide
the string by hand, but be sure that you do not apply
any force to the cart or force sensor. Keep your hands
away from between the cart and the motion sensor.
|
| 9. |
Start
the datalogger software to collect data; roll the cart
and confirm that the motion sensor detects the cart throughout
its travel. Inspect the force data. If the peak is flattened,
then the applied force is too large. Roll the cart with
a lower initial speed. If the velocity graph has a flat
area when it crosses the x-axis, the motion sensor was
too close and the run should be repeated.
|
| 10. |
Once
you have made a run with good distance, velocity, and
force graphs, analyse your data. To test the impulse-momentum
theorem, use the datalogger software to calculate the
velociety before and after the impluse and record the
value in your data table.
|
| 11 |
Now
record the time interval of the impulse.
|
| 12 |
Perform
a second trial by repeating Steps 9 - 11, and record the information
in your data table.
|
| 13 |
Change
the elastic material attached to the cart. Use a new material,
or attach two elastic bands side by side.
|
| 14 |
Repeat
Steps 9 - 12, and record the information in your data table.
|
|
|
DATA
TABLE
| Trial |
Final
Velocity
 |
Initial
Velocity
 |
Change
of Velocity

|
Average
Force
F |
Duration
of Impulse
|
Impulse |
| Elastic
1 |
(m/s) |
(m/s) |
(m/s) |
(N) |
(s) |
(N*s) |
| 1 |
|
|
|
|
|
|
| 2 |
|
|
|
|
|
|
| |
|
|
|
|
|
|
| Elastic
2 |
|
|
|
|
|
|
| 1 |
|
|
|
|
|
|
| 2 |
|
|
|
|
|
|
|
| Trial |
Impulse

|
Change
in Momentum |
%
Difference between Impulse and Change in Momentum |
| Elastic
1 |
(N*s) |
(kg*m
/s) or (N*s) |
(N*s) |
| 1 |
|
|
|
| 2 |
|
|
|
| |
|
|
|
| Elastic
2 |
|
|
|
| 1 |
|
|
|
| 2 |
|
|
|
|
Analysis
| 1.
|
Calculate
the changes in velocities and record the result in the data table.
From the mass of the cart and change in velocity, determine
the change in momentum as a result of the impulse. Make
this calculation for each trial and enter the values in
the second data table. |
| 2.
|
Determine
the impulse for each trial from the average force and
time interval values. Record these values in your data
table. |
| 3. |
If
the impulse-momentum theorem is correct, the change in
momentum will equal the impulse for each trial. Experimental
measurement errors, along with friction and shifting of
the track or force sensor, will keep the two from being
exactly the same. One way to compare the two is to find
their percentage difference. Divide the difference between
the two values by the average of the two, then multiply
by 100%. How close are your values, percentage-wise? Does
your data support the impulse-momentum theorem? |
| 4. |
Look
at the shape of the last force versus time graph. Is the
peak value of the force significantly different from the
average force? Is there a way you could deliver the same
impulse with a much smaller force? |
| 5. |
When
you use different elastic materials, what changes occur
in the shapes of the graphs? Is there a correlation between
the type of material and the shape? |
| 6. |
When
you used a stiffer or tighter elastic material, what effect
did this have on the duration of the impulse? What effect
did this have on the maximum size of the force? Can you
develop a general rule from these observations? |
Extensions
|
|
Use
other elastic materials and repeat the same experiment. |
|
|